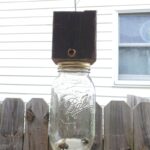
Cut your 4x4 post using a circular or hand saw making it at least 7 inches tall.
Drill a hole with the 1 inch wood boring bit in the center of the wood block 3 inches deep.
Next drill entry holes using ½" drill bit on all 4 sides at a 45 degree angle one inch up from the bottom and one and three-quarter inches from each side till it meets the center hole.
Unscrew the lid from a mason jar and lay it on the bottom of the piece of wood piece you just made. Find the center hole on the piece of wood by using your best judgement or marking it with a marker or pencil. Use a ½" metal bit and drill a hole through the metal lid to the center hole of the post.
Screw the lid onto the bottom of your trap using the 2 drywall screws. Use the hammer to put it a double point tack at the top of the piece of wood to be able to hang. Screw the mason jar onto the lid and use a welding wire to create a hanger to hang.
Before you hang the carpenter bee trap be sure to go through the area where the carpenter bees have created holes and fill all of the holes with some sort of caulking or something similar to prevent them from going back to those and hang the trap where the carpenter bees are.
Since you've filled the holes the carpenter bees will not return to the same place and will look for a new place to lay their eggs. Place the trap where the bees currently were and they will flock to the trap and not be able to get out.